
| Working with whole Records (rows) |
1. Working with individual cell values and parameters
The usual way of moving individual data values between dataset cells (defined by a column and row reference) and parameters is as follows:
Get a value from a table cell into a parameter with PAR /GET E.g.
PAR Customer_name /GET MAIN C.2 [ROW_NO]
Where col 2 of MAIN contains, say, the customer name and the row is referenced by [ROW_NO] which could be an incrementing index number in a LOOP
And to put a value into a table cell with SET /TABVAR E.g.
SET /TABVAR Customers c.2 [ROW_NO] "[CUSTOMER_NAME]"Â
Where the data value in col 2, row [ROW_NO] of table Customers will be set to the value for parameter Customer_name. (quotes used here because the parameter value is likely to contain spaces)
If we were working on multiple column cell values / parameters, these commands would need to be used for each pair used.
However, there is an alternative method if we want to work at whole record level
2. Working with whole records (rows)
For extracting data or editing it, say using the INPUT form user interface command set or for DISPLAYing, it may be more convenient to work at whole row level rather than manipulating individual items as described above.
The TAB.GET and TAB.PUT commands are very useful in as much as they work at whole row level and transfer all column data in and out of parameters with the same names as the columns in MAIN.
For example, to edit a record (all the columns for a defined table row) in MAIN and then put it back into place after editing it. This is a common function where, say you might want to use a spreadsheet (or /KEG file) as a simple database front-ended by KBL screens.
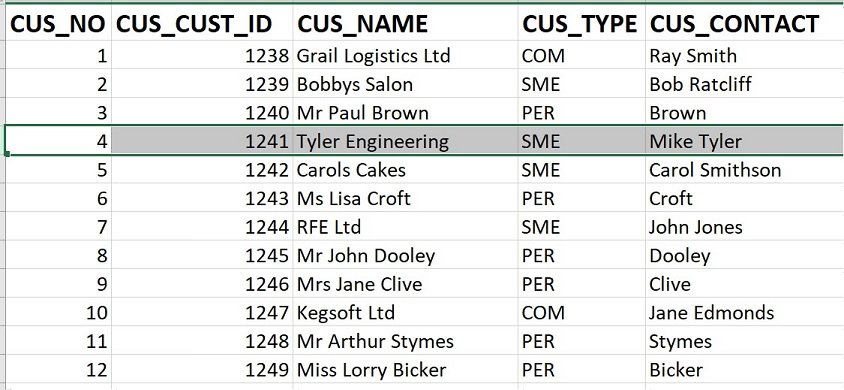
Suppose you want to edit customer records (e.g. CCC_Customers) using an INPUT form as below:
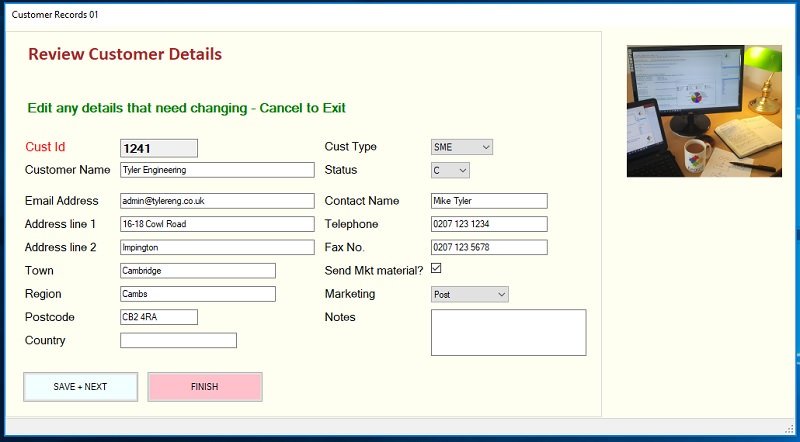
The KBL for this form is
INPUT.CLEAR
INPUT.STYLE x.SHEET_02 // Use a stylesheet to override default grey settings
INPUT.PICTURE pics:kegsoftpi1.png Autsize 200 200 800 10
INPUT.DEF /TITLE "Review Customer Details" default 45
INPUT.DEF /SUBTITLE "Edit any details that need changing - Cancel to Exit"
INPUT.DEF /FIELD CUS_CUST_ID TEXTBOX "Cust Id " 100 default blank B3
INPUT.DEF /FIELD CUS_TYPE COMBOBOX "Cust Type " 80 default
INPUT.DEF /ADDITEM PER // Restrict entry to items in a pull-down list
INPUT.DEF /ADDITEM COM
INPUT.DEF /ADDITEM SME
INPUT.DEF /ADDITEM CHA
INPUT.DEF /FIELD CUS_NAME TEXTBOX "Customer Name " 250 30 blank M1
INPUT.DEF /FIELD CUS_STATUS COMBOBOX "Status " 50 default blank
INPUT.DEF /ADDITEM C
INPUT.DEF /ADDITEM X
INPUT.DEF /FIELD CUS_EMAIL_ADDRESS TEXTBOX "Email Address " 250 default blank M1
INPUT.DEF /FIELD CUS_CONTACT TEXTBOX "Contact Name " 150 default
INPUT.DEF /FIELD CUS_ADDRESS1 TEXTBOX "Address line 1 " 250 default blank
INPUT.DEF /FIELD CUS_TELEPHONE TEXTBOX "Telephone No. " 150 default "0207 123 1234"
INPUT.DEF /FIELD CUS_ADDRESS2 TEXTBOX "Address line 2 " 250 default
INPUT.DEF /FIELD CUS_FAX TEXTBOX "Fax No. " 150 default "0207 123 5678"
INPUT.DEF /FIELD CUS_TOWN TEXTBOX "Town " 200 default blank
INPUT.DEF /FIELD CUS_MARKETING_YN CHECKBOX "Send Mkt material? " 20 default blank
INPUT.DEF /FIELD CUS_REGION TEXTBOX "Region " 200 default blank
INPUT.DEF /FIELD CUS_MARKETING_METHOD COMBOBOX "Marketing Method " 100 default blank
INPUT.DEF /ADDITEM Email // Customer preferred contact methods
INPUT.DEF /ADDITEM Post
INPUT.DEF /ADDITEM SMS
INPUT.DEF /ADDTEM " "
INPUT.DEF /FIELD CUS_POSTCODE TEXTBOX "Postcode " 100 default blank
INPUT.DEF /FIELD CUS_NOTES TEXTBOX "Notes " 200 default blank B1
INPUT.DEF /FIELD CUS_COUNTRY TEXTBOX "Country " 150 default blank
INPUT.CANVAS /CAPTION_TEXT "Customer Records 01"
INPUT.CANVAS /CANVAS_WIDTH 1050
INPUT.CANVAS /CANVAS_HEIGHT 600
INPUT.CANVAS /OK_BUTTON_TEXT "SAVE + NEXT" // rename OK button to NEXT
INPUT.CANVAS /CANCEL_BUTTON_TEXT FINISH // rename CANCEL button to FINISH
INPUT.CANVAS /SYSTEM_BUTTONS DONT_SHOW DONT_SHOW DONT_SHOW
Note the reference to a stylesheet applied to specify the colouring and some field layout characteristics (See STYLESHEETS).
First we import the data into our current script
IMPORT /XLSX CCC_CUSTOMERS worksheet=Sheet1
And create a temporary sequence number so that we can always re-insert any edited rows at the correct row:
Add / c.21 SEQ INTCol c.21 = CUSUM 1
Apply any logic needed to get to a specific record (or set of records), then using a loop index to identify the row, copy the column data from the row (record) in MAIN automatically into parameters using TAB.PUT.
LOOP L1 TAB MAIN // loop the same number of times as rows in MAIN// Create parameters with same names as columns and populate them with values in row [L1]
TAB.PUT /TO_PARS [L1]
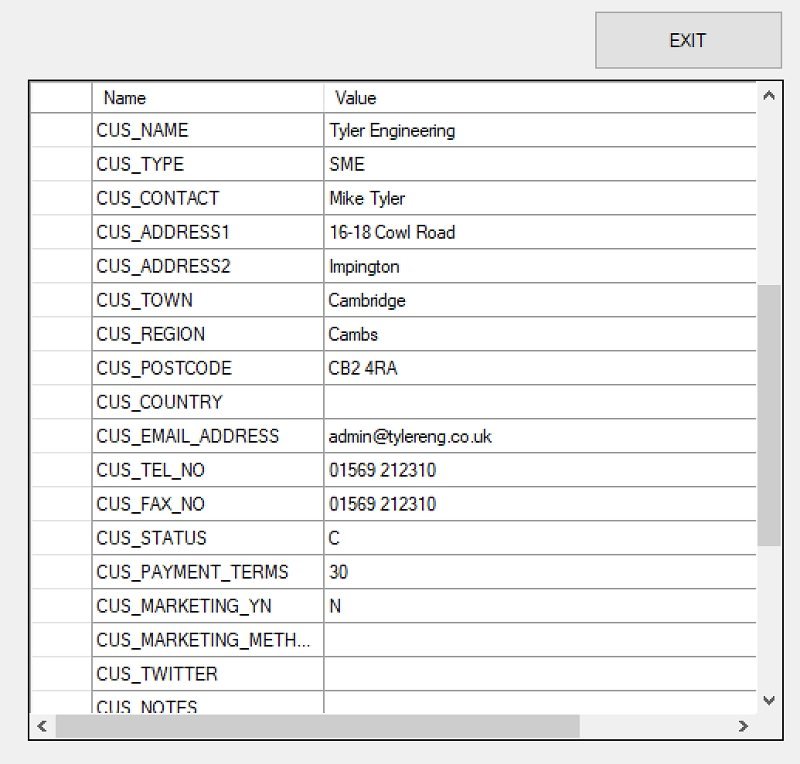
If we look at the parameters created by the tab.put command we see the following:
INPUT.PUT /PARS // copy parameter values into INPUT values
INPUT.SHOW /NO_CLEAR // Display the INPUT form without clearing the field values
(see the form as displayed above for results of the example)
We haven't used all of the parameters in the table row just the ones which match the INPUT fields. Now the user can edit the data in the form. To prevent editing or to control the behaviour of certain fields, a stylesheet can be used to modify the default behaviour of fields.
When finished, the user clicks one of the buttons which we test for
IF IS [INPUT_CLICKED] != "OK"LOOP CONTINUE // Cancel key is clicked so skip to the next record
IF END
IF CANCEL not clicked we will update the whole MAIN row by reversing the procedure.
INPUT.GET /PARS // Copy current INPUT field values into parameters of the same nameTAB.GET /FROM_PARS [L1] // Copy parameter values into MAIN cols of same name for row L1
So using this alternative approach, the user can move data between datasets and parameters and back in bulk without explicitly setting parameters to individual dataset cells using the PAR /GET and /PUT commands. The example used here relates to editing a record and putting it back into place in MAIN, however, there are many examples for data manipulation at row level where values are more appropriately processed as individual parameters rather than columns.